
by Tom Ehrhart
Rebuilding the Girling servo is a critical operation that requires cleanliness, care in disassembly/reassembly, and moderate mechanical dexterity. If you are a little weak in or doubtful about the latter, get a qualified individual to help or do not attempt this rebuild. If you are apprehensive about attempting this rebuild-don’t! The worst that can happen is the brake fluid will leak out causing the brakes to fail, or the brakes will lock up making the vehicle immobile, or the brakes will fail to release completely causing severe brake pad rotor and shoe/drum damage, or (finally) no brakes at all. YOU guess what happens next!
Now that you have been appropriately put on guard or scared, let’s start. Removal of the unit from the car is made easier by first removing the manifold vacuum line banjo fitting and the small air filter element on top of the unit. This provides more room to get a 7/16″ wrench on the input and output lines.
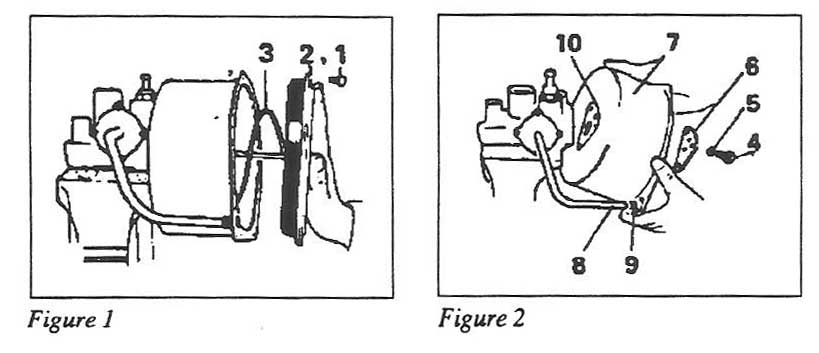
Remove the lines before removal of servo from mounting brackets. Follow Figures I through II for disassembly (dismantling) instructions. With the unit cleaned, examine all bores for corrosion, pitting, scoring, or ridges. Using a flashlight is one of the best ways to examine the bores.
At this point of your examination, you are bound to find the bores in need of service. Pitting is almost always a result of moisture buildup within the fluid and is usually quite severe with servos that have not been used for extended periods of time (a year or more). Scoring and ridges are a result of piston scrubbing from use.
In all cases, these bore conditions must be rectified. You are wasting your time and possibly your life if you do not restore the bores. This is the main secret of a successful servo rebuild.
Despite appearances, most bores are repairable by honing. There are three (3) bore sizes in your servo, they are as follows: Vacuum Upper Bores, Lower Bore Canister ID, Small (5″) 3/4″, 5/8″, 7/16″, 3/4″, Large (7″) 3/4″, 5/8″, 3/8″, 3/4″.
When determining booster size, check diameter of rear cover. The small is approx. 6″ and the large is approx. 7-1/2″ Commercially available hones are usually available for the 3/4″ bores, but you will have great difficulty finding hones for the smaller bores.
It is easy to make your own hones, though. With a brass rod as shown in Figure 12 (liberally coated with fine grit valve lappng compound), insert it in the bore and rotate it back and forth and out until ridges and pits are eliminated. In the absence of honing, #400 wet/dry sandpaper wrapped around a rod can sometimes be used to remove bore imperfections.
Then, with #0000 steel wool wrapped around a rod inserted in a high-speed drill, polish bores to a mirror finish. Again using a flashlight, look down the bores to verify your handy work. At this point, if all bores are satisfactory, clean one more time with a strong detergent and hot water.
Remember, if you would not eat off of it, it is not clean enough!
Now precoat all hydraulic parts with synthetic silicone brake fluid and assemble unit as shown in Figures 13 through 18. Next, prepare vacuum cylinder piston for reassembly. Using #400 wet/dry sandpaper, polish cylinder bore. With the rubber strip removed from behind the leather seal, wrap a dry rag around the leather seal overnight to absorb brake fluid. Do not use solvents to do this job.
Thoroughly saturate the leather seal with a silicone lubricant (usually in spray cans) or use lubricant supplied with the rebuild kit. Coat the cylinder bore with the same lubricant. Continue assembling as shown in Fig. 19 through 23. Just prior to replacing the cover plate, fully depress piston several times. The piston must be pushed completely out of the bore by the return spring (Fig. 21 Item 3) without sticking. If it does stick, remedy the problem by adding lubricant on the leather seal and/or using a razor blade to cut the foam seal (Fig. 22 Item 41) in half lengthwise.
NOTE: If the piston sticks, your brakes will lock up or not completely release causing severe brake rotor and caliper damage. It is highly recommended that you use a synthetic (silicone) brake fluid in your new rebuild and the rest of your brake/clutch system.
Editors Note: Silicon Fluid should not be used in a racing application due to its higher rate of compressibility.


(see Tech Tip K20 – Rebuilding the Girling Servo Unit for more on this topic)