
by A. Wojtowicz and M. del Prado in the August 1977 RootesReview:
If you own an Alpine/Tiger you will probably have to rebuild the Girling Servo Unit. Here are a few secrets that make rebuilding the servo a successful operation.
Removal of unit from the car is made easier by first removing the manifold vacuum line at the unit and the small air filter from the unit. This provides room to get a flare nut wrench on the input and output lines of the unit. Remove the lines before you remove the holding bolts and straps.
Disassemble according to the instructions in the rebuilding kit (SP 2228 for the large unit, SP 2230 for the small unit). The most critical part of the whole disassembly procedure is the removal of the circlip in the lower output cylinder bore. The most inexpensive inner circlip pliers work the best (VACCO Company; $2.45). The piston compressing tool (See Diagram) can be easily bent from an old coat hanger. The actual dimensions of this tool are not really important, The idea is to depress the lower bore piston to allow removal of the circlip.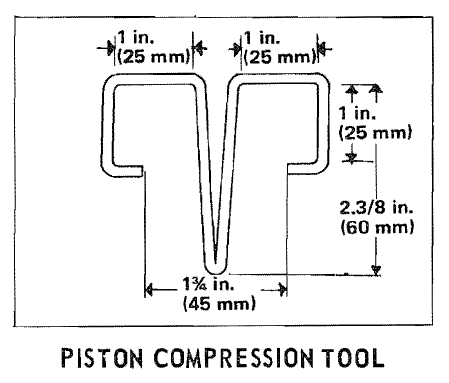
Once disassembled the entire unit should be washed in soap and water. Then with #400 wet/dry sandpaper, tear off a strip about 2 inches wide and about 8-10 inches long. Tape one end of the paper on a 3/16th inch wooden dowel in such a way that when it spins it will “hone” the inside of the bores. Use an electric drill to spin the dowel. The lower output cylinder has the same diameter bore all the way down, but the upper cylinder has 3 different diameters.
Care must be taken to ensure that all 3 are honed until the shine is gone. You can direct a light down the bores to see if the shine is gone. Keep tearing off the #400 sandpaper to expose a fresh sanding surface. Hone each bore for about 5 minutes with a back and forth motion. Wash in hot soapy water to remove all of the grit.
When assembling the unit, make sure that the large vacuum piston that moves back and forth in the canister is absolutely free. If you have any doubts how smooth the inside of the large vacuum cylinder is, smooth it down with #400 sandpaper. Use the Girling grease supplied in the kit, making sure that the entire leather seal is coated. If the large plunger does not move freely inside the vacuum cylinder it will stick and your brakes will remain locked when you apply them. When replacing the large vacuum piston inside the large vacuum cylinder you can hold it down to make installation of the front cover a lot easier by having a friend place his finger over the inlet port for the manifold vacuum hose.
Bleeding the brakes can be facilitated by running the engine to assist in forcibly expelling any air bubbles in the unit.
I have heard contradictory statements about “honing” aluminum but I can speak from experience that it works. It is cheaper than buying a new one at over $115.00. My unit has been in operation for over a year since the rebuild without any loss of fluid or braking efficiency.
Technical Editor’s Notes:
Determining whether your booster is a large unit or a small unit is easily done by one of two ways.
- Measure diameter of booster cover: about 7-1/2 in. for the large; about 6 in. for the small.
- Count number of screws in cover adjacent vacuum pipe (circled- area): 3 for large; 2 for small.
(see Tech Tip K11– Servo Unit Rebuild Instructions for more on this topic)