
by Phil Lindsay in the July 1979 RootesReview
In order to better cope with the California gas lines, I have installed an extra gas tank in my Tiger. My additional tank comes from the early series Alpine I and II. The tank is a horizontal unit which holds approximately 12 gallons and can be mounted in the flat region of the Tiger trunk. The extra tank is installed in such a way that it fills and empties with the two stock side tanks. Although the trunk space is reduced, I am able to carry lots of spare parts, four tool boxes, spare tire, and still have room for an airlines carry-on suitcase.
The first step involves relocating the battery from the stock Mark I Tiger location (right side of trunk) to the spare tire well. This operation requires a little metal bending and hammering to put a flat bottom on the well. I covered the area with fiberglass cloth and resin for reinforcement.
The Alpine tank has a filling pipe on its right side and a fuel pump feedline connection in the center of the bottom: back edge. In my installation, the tank mounts “upside down” so that the filling neck points towards the rear bumper and the pump connector is on top. The filler neck is then connected to the main gas line between the side tanks. The pump connector becomes a vent line that ties into the side tank vent line.
I had my local radiator shop boil-out and leak-test the tank. Once cleaned out, the shop re-positioned the filler neck so that a “tee” connection could be made into the main gas cross line. I found that copper plumbing fittings can be purchased with an outside diameter that slips inside the stock rubber couplings. A detail of this set-up is shown in Photo #1.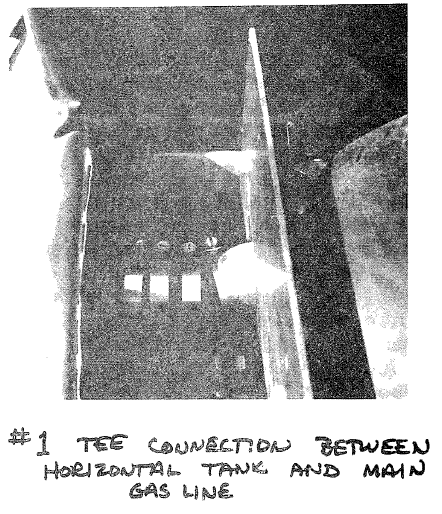
As shown in photo #2, the tank is positioned between chassis rails using pieces of steel angle channel. The channels straddle across the chassis rails and the tank bolts to the channels with its existing bolt holes. In order to use the space surrounding the sides of the tank, I used masonite panels to partition the area into storage bins.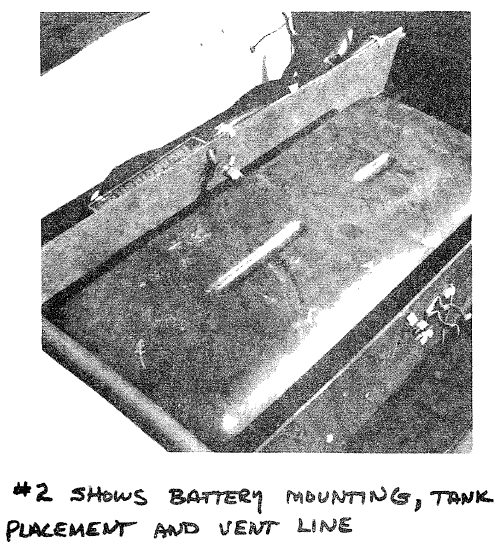
The tricky part of’ the installation is positioning the tank so that there is enough vertical clearance for the spare tire. Once this location is established, it is necessary to determine the correct combination of copper tees and short nipples to make the connection between the tank and the main gas cross line. In my installation the very bottom of the horizontal tank (less than 2 gallons) is positioned so that it doesn’t drain out. This could be corrected by mounting the tank higher, but then there would be no room for the spare tire.
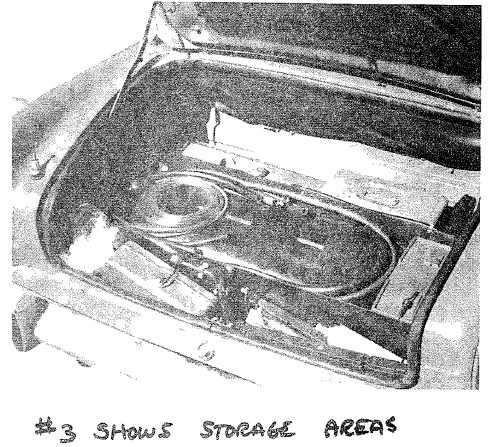
Photo #3 shows the various storage areas. There is lots of room spare hoses, parts, and tool boxes. I modified the false bottom by ·taking out the battery hump. As shown in Photo #4, the false bottom fits over the tank and permits storage of the spare tire.
I have been using the system for over a year with no problems. Although there is no improvement in gas mileage, my driving range has doubled. I find that the stock gas gauge is accurate at the extremes (empty and full), however the readings in the midscale are not linear.
Obviously it is extremely important to properly connect the tank to insure leak-tight fittings. I suggest that new OEM rubber couplings (available from Tiger Tom or Rich McLeod) and stainless steel worm clamps may be used. The vent hose must be rated for fuel service.
I am a little concerned about rear end collisions (a la Pinto!). But the stock Tiger set-up is so bad due to the vulnerable cross-pipe mounting, that I doubt that the extra tank is much worse. I have installed an impact sensing switch on the electric fuel pump circuit in order to shut off the pump in the event of an accident.