
by John Logan in the May and June 2006 RootesReview:
Part I
This section addresses how to select the correct carb for your application, demonstrate the steps for calibration, show how to set the floats and adjust the idle mixture and speed.
The Holley carburetor can be calibrated to the engine for optimum fuel economy and performance. In this article I will describe what modifications are available for a generic 4150/4160 Holley four barrel. Since most of us don’t have a flow bench with a lot of specialized instrumentation, I will describe back yard methods using common mechanics tools, a vacuum gauge, eyes, ears and a sensitive butt. I will discuss carburetor size, describe how to set float levels, adjust idle and select the main jets. Part II will cover the power valve, vacuum secondary, the accelerator pump and flooding problems. I have refreshed my own experience with information from the following web sites. www.Holley.com and www.mortec.com. You may want to go to them for more complete information. Many of you are Holley experts and have better methods than what you will read here, so please write in and describe them.
Prerequisites
In order to calibrate the carburetor to your engine, the engine must be in reasonably good shape with a properly timed distributor, no vacuum leaks and clean fuel and air filters. Hopefully, you are familiar with the Holley and it is clean or recently rebuilt with a Holley kit. The carburetor can remain and metering bodies several times. I recommend that you use the reusable blue foam type gaskets.
Before you start, take note any specific problems you may be having like fuel leakage, black smoke, surging, lack of power, hesitation, erratic idle speed or poor idle quality.
Carburetor size
Good calibration requires the proper carburetor size for your engine, and more is not better. Carburetor size can be a very emotional status symbol. If you tell someone that their 302 CID engine with the 700 CFM carburetor would run better with a smaller one, look out. For this reason I will just introduce the formula and comments that Holley has in their web site, make my recommendation and let you figure it out.
You need to know the size of the motor, CID, the maximum RPM you intend to run your engine and the VE% (Volumetric Efficiency Percent). VE% is a hard one to estimate without a very expensive dynamotor and measuring equipment, so make SWAG! For reference, Holley says, “Many high performance engines reach 100%. Certain race engines can actually exceed a VE% of over 100%. Stock production, and low performance motors will fall around 75%-85%.”
Put your data into the following formula:
Optimum Carburetor CFM = (CID X RPM 3456) X VE%
From here things get a little arbitrary. Holley says that vacuum secondary will only open the secondary enough to feed the engine what it needs. Likewise, using a split plenum type street manifold allows the use of a larger than normal carburetor. They don’t specify how much increase.
So what does all that mean? For those who want good drivability in a street vehicle, use a split plenum intake, a carburetor with vacuum secondary and a maximum size of 450 CFM for a 260 cid engine and a 600 CFM for a 302 cid Engine.
Carburetor Calibration/Fuel Pressure Control
The fuel level in the float bowls must be correct before any adjustments or calibration is attempted. Fuel level in Holleys is sensitive to high fuel pressure, so the pressure must be controlled. If you are using the stock Lucas pump you won’t have a high-pressure problem, because it can only produce as much pressure, somewhere around 2-4 psi, as the fixed spring operating against a fixed diaphragm can produce. It is therefore inherently safe from over pressure. Many centrifugal pumps such as a 5-7 psi Carter pump rely on an internal pressure relief valve to control the pressure. The downside is that if the relief valve gets dirty or sticks when the car sits for a while, the pump output pressure will fluctuate and can rise as high as 10 to 15 psi, causing the fuel level to rise or the float valves to leak, flooding the engine.
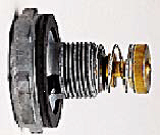
 The externally adjustable valves may leak through the needle valve seat or around the “0” ring seals. When examining a valve there will be no evidence that it leaked. For this reason, you should install a regulator such as the Holley with a pressure gauge in one port like the one shown.
Put the regulator as close to carburetor as possible and set the pressure to 4 to 4.5 psi with the engine running. Check the gauge once in a while to make sure nothing is changing.
Fuel Level
Carburetors with a 5/8″ nut and a lock screw on each float bowl have adjustable needles. If it doesn’t then you must remove the bowls to adjust the needles inside. Turn each fuel bowl upside down with the float supported by the needle. Adjust the float by bending the tab on it to bring top of the float within 13/16″ of the bowl housing for the primary and 3/4″ for the secondary. If you have a rebuild kit, it should have a gauge for this adjustment. Install the bowls and you should be done.
If your carburetor has exterior adjustable needles and the bowls are off the body, make the preliminary adjustment of floats by inverting the float bowls and turning the needle assembly with the adjusting nut so that the top of the float is parallel with the top of the bowl. Now you can install the bowls and hook up the fuel line.
Next, adjust both needles so that the fuel levels are in line with the bottom of the sight plug ports. There will be a lot of fuel leakage so do this outside with a shop towel and fire extinguisher handy. With the vehicle on a level surface turn on the ignition so that the pump fills the bowls. Adjust your pressure regulator to 4 to 4.5 psi if you have one. It’s easier to make the first check without the pump running, so turn it off. Remove the sight plug of each bowl to check the actual fuel level. Replace them and make a fuel level adjustment by loosening the lock screw and turning the adjusting nut clockwise to lower the level or counter clockwise to raise the level. Each hex flat on the nut will change the float level approximately 1/32″. Turn the pump on and then off and check them again. When you have each level set, start the engine, let it idle, readjust the pressure regulator and repeat the process. With the engine running there should be a very slight leakage out the sight plug ports due to the engine vibration.
Idle Mixture and Speed
Connect a vacuum gauge to the manifold below the carburetor to read total vacuum. You may have to find a plug on the manifold and adapt a fitting. Turn each adjusting needle on the primary metering body clockwise in until it lightly seats and then turn it out one and a half turns. Start the engine and get it up to operating temperature. Set the idle speed where you like it, about 900 RPM is a good speed for a mildly modified engine. Next, adjust each needle valve 1/4 turn at a time until the manifold vacuum is at the maximum. The engine idle speed should increase.
Grab the linkage and rev up the engine between adjustments to normalize everything, then re-adjust the idle speed and repeat the process. When you reach the high point of the vacuum, turn each jet 1/16th counterclockwise rich. You should now have a smooth running engine at the desired RPM. If you don’t have a vacuum gauge you may just use idle RPM as the indicator but it won’t be as precise. If you have difficulty making the needle adjustments or adjusting idle RPM, you may have one or more of the following problems:
- Dirt in a passage way
- A vacuum leak
- A gasket leak or a gasket alignment problem
- Damaged idle needles
- Worn butterfly shafts
- Secondary that are adjusted open too far
- Binding of the secondary mechanical linkage
Selecting the Main Jets
Excessively large main jets may be the reason for low mileage and black smoke. If the jets are too small, surging may be the result. The main jets are located on the primary metering body so you must remove the primary float bowl and the metering body to get to them. Jet size increases as the size of the carburetor goes up. The chart below has representative sizes for sea level operation and an inlet air temperature of 70 degrees Fahrenheit. Start with one of these. If you have a hint of black smoke or the tail pipe turns black inside, reduce the jet size. If you feel any surging while driving at a constant highway speed, disconnect the vacuum line to the distributor to make sure too much advance is not causing the problem. If it’s not the advance, you may need to increase the jet size.
| Carburetor Size | Part Number (122-) | Hole Size |
|---|---|---|
| 450 cfm | 57 | 0.056" |
| 550 cfm | 62, 63 | 0.061", 0.062" |
| 600 cfm | 64, 65, 66 | 0.064", 0.065", 0.066" |
| 650 cfm | 67 | 0.068" |
| 750 cfm | 68, 69, 70 | 0.069", 0.070", 0.073" |
For every 2000-foot increase in altitude, reduce the jets by one size. Gasohol, with its lower heat content may require larger jets and will reduce gas mileage. That stuff is very hard on old carburetor parts. If you have been using gasohol and notice a white deposit inside of your carburetor then it has been eating away at the non-anodized aluminum. The new Holley carburetors can handle gasohol. If you use the 85% ethanol, be prepared for a complete rebuild of your Sunbeam fuel system.
Part II
This part covers the power valve, vacuum secondary, the accelerator pump and flooding problems.
Power Valve Selection
The power valve provides extra fuel when the throttle is open for heavy acceleration. A diaphragm is exposed to intake manifold vacuum, and with enough vacuum it overcomes a spring force to close the valve. The goal is to select a valve that will open to supply more fuel to the engine under high throttle operation and low manifold vacuum and close for fuel economy during part throttle cruising when manifold vacuum is high. To get to the power valve, disconnect the fuel line and remove the float bowl and the metering body on the primary side. Older valves are stamped on one of the four flats with a number such as 125-65. New valves are stamped on the large diameter disk. The number 65 indicates that the valve will open when the manifold vacuum drops below 6.5″ Hg. Common power valve sizes are 25, 35, 55, 65, 85 and 105. If you have a stock engine, install a 125-65 or 125-85 valve. If it is mildly modified install a 125-65 valve, and if your engine is highly modified, use a 125-55 valve. A valve within these ranges may already be installed in your carburetor, but if it is an old valve you may want to replace it anyway. Your final decision, which may take several iterations, should be based on how the car drives. It will take some experience to tell if the power valve is opening. Belching black smoke under part throttle indicates the valve is running open; replace it with one with a lower number. If your interest is in fuel economy you will want to select a valve with the highest number that doesn’t cause surging during acceleration.
Loss of Power in a Turn
If you autocross or road race your car and find after making all these adjustments you lose power in a turn, then the fuel level may be too low. You can raise it but you should be prepared to go through these adjustments again.
Adjusting Vacuum Secondary
A vacuum motor with a passageway leading to the intake manifold controls the secondary. A mechanical link goes between the primaries and secondaries to close the secondary when you want to suddenly decelerate from full throttle operation, such as when you see the radar gun pointing at you. The link also keeps the secondaries closed under idle operation and restricts the opening angle during part throttle, high vacuum operation. During the first part of full throttle acceleration, when the primaries are wide open, the secondaries are held shut by a spring within the vacuum motor. As engine RPM increases, the intake manifold vacuum rises to a point where the diaphragm overcomes the force of the spring. At this point, the secondaries begin to open.
The vacuum secondary should be held partly open at idle by a small lever that rests against an insignificant looking adjustment screw on the bottom of carburetor body just below the vacuum diaphragm body.
If the butterflies are not slightly open they may jam in the bores and stick. If the butterflies open too far at idle they will allow too much mixture in the manifold; when you try to adjust the idle mixture with the two needle valves, nothing will happen. Also, you may not be able to reduce the idle speed. You can adjust the stop with the carburetor on or off the engine. I use two screwdrivers made from 7/64″ Allen wrenches ground with screwdriver blades at 90º to each other. Turn the screw counter clockwise until the butterflies contact the bores and the round end of the screw touches the tab. Then turn it 1/2 turn clockwise. If you can’t turn the screw then you can use the backyard method of carefully bending the tab that contacts the screw. If you hold the base of the carburetor up to the light you should be able to see some clearance at the bores.
Adjusting the Secondary Opening Rate
To check for full travel, open the primary throttle, pull the secondary linkage up and look down the secondary bores. If you are unsure whether the secondary are opening while driving, clip a paperclip on the secondary diaphragm rod and push it up against the housing. Go out and give the car a full throttle high rpm run. When you return, the paper clip should be pushed down the rod to show you how far they opened; if you are unlucky it will have popped off, never to be seen again.
The opening rate by the vacuum motor is adjusted by changing the color-coded spring inside the housing. Holley makes springs with different tensions that run from light tension to heavy as follows:
- White – Lightest
- Yellow (Short Spring)
- Yellow
- Purple
- Plain (steel grey)
- Brown
- Black—heaviest spring
Holley offers a kit (PN-20-13) that contains one each of these springs.
If there is a lag or hesitation when the secondaries open the spring tension is too light, allowing them to open too early. You should go to the next heavier spring. If the engine is sluggish in response at full throttle and it seems to take too long for the secondary to open, go to the next lighter spring. To change the spring you must remove the cover by first removing the vacuum motor from the carburetor body.
Accelerator Pump
The accelerator pump system consists of a diaphragm pump that is actuated through a lever and cam on the primary throttle shaft. The nozzle has two holes, one for each barrel of the primaries that squirt down the primaries as they are opened. You don’t a want lag when you tip-in the throttle so fuel must immediately discharge when the throttle begins to open. Also, the lever must not bottom out at full throttle and bind up the linkage.
Make preliminary adjustments on the bench if possible but you can also make them with the carburetor on the engine. First, adjust the nut on the override screw, the one with the spring, so that there is about .015″ clearance to the fully compressed lever at wide-open throttle. When the carburetor is installed and filled with fuel, slowly open the throttle while watching the lever and the two nozzles in the top of primaries. The lever must move and fuel must spray out both nozzles immediately. If the lever moves but you don’t get immediate fuel, the adjustment is not right, the diaphragm has failed or is not properly installed or there may be a dirty or missing check valve.
There is a cam on the throttle shaft that can be adjusted, turned over or replaced to vary the ramp angle for different amounts of fuel during tip-in. Many stumbles can be avoided using the more aggressive Holley part # 20-12.
Other Causes of Flooding
Dirt can cause varying fuel levels in one of the float bowls. To check, loosen the nut on the float valve and screw the valve out. Count the number of turns as you take it out so you can return it to its original position. Check for dirt, blow it out and replace it.
If you are lucky you fixed it! If there is still a problem, pull the float bowl to see if there is dirt that has been passing through the float valves.
The power valve in Holleys prior to 1992 are sometimes susceptible to blowout during a backfire. This often happens when you are trying to start a new or rebuilt engine and the distributor timing is off. Newer Holleys have a check valve that closes to protect the power valve. You can add a check valve to early carburetors, Holley (PN – 125-500). To determine if the power valve is the cause of flooding, quickly start or switch the ignition on and off to pressurize the carburetor, remove the primary float bowl and metering body and look for gasoline behind the power valve. If there is fuel, it is definitely blown. If it is dry, however, it may be a leaker that had time to dry out. You can’t tell if it’s blown by looking at it but you may be able to check the diaphragm by sucking on the large end and plugging the hole with your tongue to see if it will hold a vacuum for 20 to 30 seconds. If you suspect that the valve leaks replace it and add the shield.
The two vent tubes that stick out of the top of the carburetor body should be cut at a 45-degree angle and clear the top of the air cleaner so that they don’t get blocked off.
A plugged tank vent may cause flooding or starvation. If the car is sitting in the sun the pressure may go high enough to force fuel through a float valve. Starvation will cause erratic engine running. Usually the cap gaskets on old Sunbeams leak enough that a plugged vent is not a problem.
Loose or leaking carburetor gaskets will allow internal leakage resulting in flooding or poor performance. Replace them with the reusable blue foam gaskets and tighten the screws evenly to 40 in-lb. Use the right kit for your model number recommended by Holley. You will find the “list” number on the choke housing. Inspect the gaskets to make sure all the holes are in the proper places. Using the wrong gaskets is a common mistake – there are so many variations and the differences are not evident. If you use the wrong gaskets, you may have poor power, a problem reassembling the carburetor or a leak somewhere. I have done all of these.
[…] the sizing of your carburetor. If you have too big of a carburetor and the engine can never use the full CFM, it’s not going to […]