
by Larry Paulick in the March 2006 RootesReview
In the rush to get the Tiger out of the door, Rootes or Shelby, or whoever, did not provide a full fan shroud for the Tiger. The result: overheating because the hot air from the radiator recirculates from the engine side, down past the cross member and back in the front of the radiator. Because of the incomplete shroud, the efficiency of the fan is reduced significantly.
Tiger Tom and Chuck King’s article Cooling the Tiger is an excellent study of various fans, radiators, electric fans, block offs, etc, to determine what works in the real world with a Tiger at idle and on the road at speed. If you have not read this article, it is a must to understand the cooling issues of your Tiger. This dispels a lot of myths, and leads you on the path to a Cool Tiger.
Benefit of a Full Shroud
Have you ever seen another factory car without a full 360-degree fan shroud? I have not, and the Tiger can benefit from a full shroud as well. One point in the Cooling Article was a test with the same radiator and fan, but with the stock Tiger shroud compared to a full fan shroud. The results were impressive. The stock shroud could pull 751 CFM, while the full 360-degree shroud pulled 953 CFM. An impassive 26.7% increase, with the same fan and radiator.
Fabrication
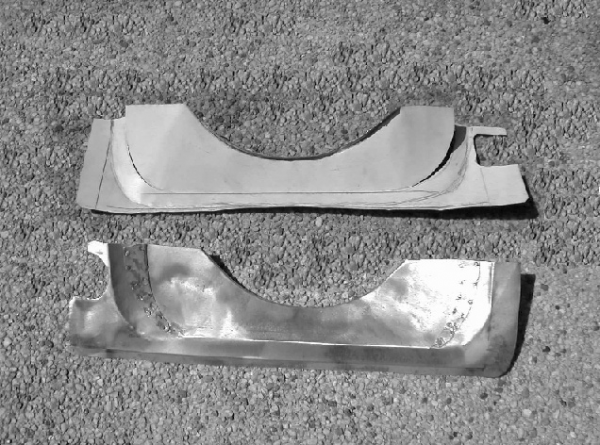 To fabricate the fan shroud, I took out the original shroud and fan to gain access to the area. I am using the MG Midget rack and pinion, but the process is the same for the Tiger rack and pinion. (See photo ) I used a piece of aluminum flashing to start the mock-up of the lower fan shroud. This alum material is easy to form, cut, and holds it shape during the process. Spending time during this part of the process will help in the final product. After I was happy with the form, I started to make the final shroud using 20 gauge-galvanized steel, to which I transferred the measurements from the aluminum form. Although I cut and welded a section of metal in a portion of the shroud that is bent out too far to hammer form, you can use pop rivets instead to attach this metal. As with the form, you need to spend time fitting, cutting, and bending until you are happy with the way the shroud fits the radiator, clears the fan and mates to the upper shroud.
You can use a bag of sand and a soft faced hammer, such as a rubber or rounded plastic hammer, to shape the rounded portion of the shroud. The sand acts as a dolly and conforms to the shape of the part. This is how the pros do their metal work. Take little bites of the elephant, or hammer blows, as it is hard to eat the whole elephant at one time.
Installation
To attach the lower shroud to the upper shroud I welded tabs on the bottom shroud and welded nuts on the backside of the tabs. This way when I screw the upper shroud to the lower shroud taps, I don’t have to fool around with the nuts falling and losing the nuts. It’s bad enough dropping the screws.
First, install the lower fan shroud. Then loosely install the fan, and screw the upper shroud to the lower shroud tabs. Check to see that everything fits. You may have to add some foam around the lower or upper shroud to seal the final assembly.
If you add studs or bolts with the heads cut off to the water pump hub it is easier to install the pulley, spacer in my case, and fan as opposed to trying to find the right alignment for all of these pieces. You will find that the lower shroud is stronger than the upper, which is not unusual, considering how the upper shroud was fabricated. After you are happy with the fit, paint the lower shroud and after it dries install the assembly and sit back and admire your work.